


9Apps menyediakan banyak aplikasi dari India. 30,000+ Pengguna mendownload Cara Membuat Bonsai Kelapa versi terbaru di 9Apps secara gratis! Lebih banyak fungsi yang ditambahakan dalam aplikasi ini. Aplikasi HOT ini di rilis tanggal 2019-08-03. Anda dapat melihat aplikasi terkini di 9Apps.
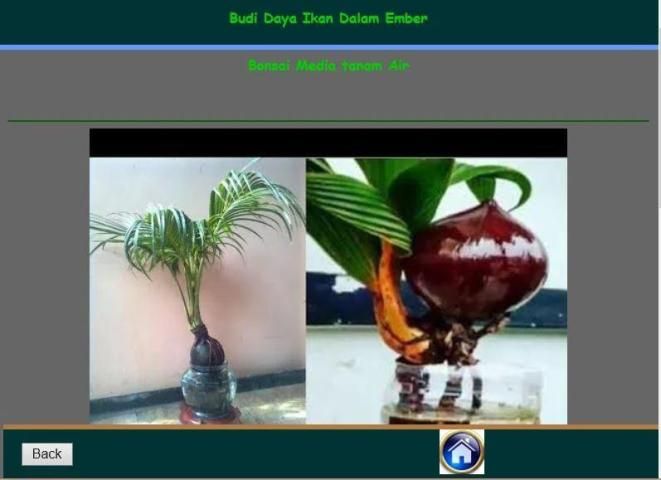
BONSAI KELAPA
belakangan ini sedang hits Tentang Bonsai Kelapa, banyak orang kemudian mencoba membuatnya, Didalam Aplikasi Ini berisi Panduan lengkap pembuatan bonsai kelapa mulai dari pemilihan bibit sampai perawatan.
Cara Membuat Bonsai Kelapa
1. Persiapan Bibit
Langkah pertama yang harus anda lakukan adalah menyiapkan bibit kelapa. Untuk mendapatkan hasil seperti yang diinginkan, saran saya gunakan buah kelapa yang sudah tua. Kelapa yang sudah tua akan cepat memiliki tunas baru. Namun jangan gunakan buah kelapa yang sudah terjatuh di tanah karena memiliki bentuk yang tidak menarik dan mudah rapuh karena sudahtetapi yang masih melekat di pohonnya. Kelapa tua yang sudah jatuh ke tanah memiliki bentuk yang tidak menarik dan mudah rapuh. Jangan pula memilih kelapa yang terlalu kecil ataupun terlalu besar, karena akan susah dibentuk. Selain dari ukurannya, anda harus memperhatikan jenis kelapa yang anda gunakan. Kelapa yang bisa di bonsai adalah kelapa gading susu, kelapa gading merah dan kelapa albino.
2. Penentuan Posisi Batok
Ini merupakan langkah terpenting untuk menentukan bentuk awal bonsai kelapa yang anda buat. Bagian batok merupakan pusat perkembangan buah kelapa yang menjadi penentu bentuk pola bonsai. Untuk membuat tunas baru, letakkan bibit kelapa yang belum bertunas di atas tanah yang memiliki kandungan air yang banyak. Tunas akan tumbuh sekitar 1-2 minggu. Jika anda menginginkan bentuk batok yang dikelilingi akar, letakkan batok pada posisi vertikal. Sedangkan jika anda ingin membentuk batok seperti rumah siput, letakkan secara horizontal.
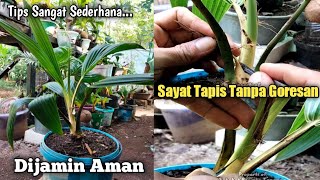
3. Proses Pengupasan
Jika tunas sudah mulai muncul, buka kelapa menggunakan pisau secara perlahan dengan memotong miring 1/3 bagian belakang kelapa. Buat sayatan bujur dari tunas ke belakang hingga menyentuh batok. Setelah itu kupas sabut dengan tang secara perlahan hingga semua sabut bersih. Jangan sampai merusak akar dan batoknya.
BONSAI KELAPA
lately being hits About Bonsai Kelapa, many people then tried to make it, In This Application contains a complete Guide to making coconut bonsai from seed selection to treatment.
How to Make Bonsai Coconut
1. Seed Preparation
The first step you have to do is prepare coconut seeds. To get the results as desired, I suggest using old coconut fruit. Old coconuts will quickly have new shoots. But do not use coconuts that have fallen on the ground because they have an unattractive shape and are easily brittle because they are still attached to the tree. Old coconuts that have fallen to the ground have a form that is not attractive and easily brittle. Don't also choose coconuts that are too small or too large, because they will be difficult to form. Apart from its size, you must pay attention to the type of coconut you use. Coconut which can be bonsai is coconut milk ivory, red ivory coconut and albino coconut.
2. Determination of the Position of the Shell
This is the most important step to determine the initial form of coconut bonsai that you make. The part of the shell is the center of the development of the coconut which determines the shape of the bonsai pattern. To make new shoots, place the coconut seeds that have not germinated on the ground that have a lot of water content. The shoots will grow around 1-2 weeks. If you want a shell surrounded by roots, place the shell in a vertical position. Whereas if you want to form a shell like a snail house, place it horizontally.
3. Stripping Process
If the buds have begun to appear, open the coconut using the knife slowly by slicing the 1/3 back of the coconut on its side. Make a long incision from the bud to the back to touch the shell. After that, peel the coir with the pliers slowly until all the coir is clean. Do not damage the roots and shell.

9Apps 4.9